Homebrewing with a Closed Transfer System

Homebrewing with a closed transfer system is all about minimizing your wort’s contact with air during the brewing process while achieving a naturally yeast-carbonated beer. There are steps which one can take to develop such a system on both the hot side of brewing and the cold side. Here I will discuss a few techniques and mechanisms for eliminating oxygen exposure on the cold side of brewing beer at home. This process starts with a chilled wort, ready to be brought to life by pitching the yeast into it.

Closed Transfer System
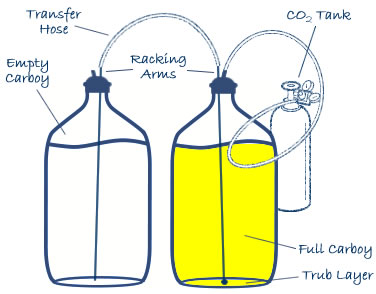
Closed carboy transfer using CO2 pressure

You can develop a closed transfer system whether you are using carboys, soda kegs or Sanke kegs, but the use of Sanke kegs is quite superior considering that it takes the same amount of time to make 12 gallons as it does 4 gallons. The first thing to consider is what kind of brewing tools and equipment (i.e. fermenting vessels) you already have at hand, and what parts and vessels you will need to enclose the process of fermenting, racking, carbonating, and aging your home brew. Keep in mind that kegs, be they Soda kegs or Sanke kegs, can be used as both primary and secondary fermenters. By using them as such, you will be able to create the tooling you need to transfer your beer from one keg to another.

Closed Carboy to Keg Transfer System
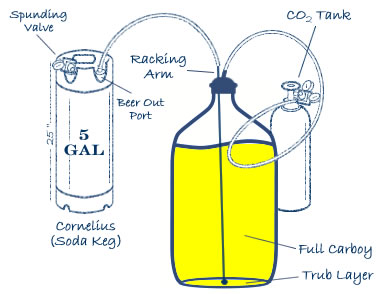
Closed carboy to keg transfer using CO2 pressure.

If you are using Soda or Sanke kegs as fermenting vessels, it is a good idea to modify your liquid-out tube by shortening it by half an inch to one inch to ensure that less of the yeast sediment is taken up during the liquid transfer of the racking process. You will also need to create a pressure release valve (called a spunding valve) and attach this unit onto what is normally the gas-inlet for the keg.

If you are using a glass carboy for your initial fermenter, you will have to install a racking arm siphon tube through a rubber carboy cap when you begin the fermentation process by pitching yeast into the wort. You will need a cap with two holes as well, so you can purge the inside of the carboy of air before pitching the yeast. No matter what your initial fermenting vessel is, you will want to fill the vessel with CO2 after pitching the yeast, to ensure that a minimum of air contact is maintained.

Pressure Positive
The use of a closed transfer system is best done in a pressure positive environment. There are many who postulate that a beer whose entire fermenting and aging life is maintained at this positive pressure – around 15 PSI - tastes much better. This process also ensures that the beer is carbonated naturally, as part of the fermentation process. The risk of contamination is certainly reduced from such a practice. There is obviously a lot of difficulty in maintaining this pressure in a glass carboy – the cork will just pop off – but for those of you dedicated to the glass, you can start maintaining pressure after your secondary fermentation has begun. Keep in mind that this will result in a beer that will not be as carbonated as a beer that is fermented entirely in a positive pressure environment, and the taste will be affected.

For those achieving primary fermentation in a soda or Sanke keg, you will benefit greatly from the use of a Spunding valve. The spunding valve will maintain a certain amount of pressure in your keg, and open up to release excess CO2 at a pressure pre-determined by you. One of the great benefits of the spunding valve is that it will keep the beer from foaming out during high krausen, when your yeast is most actively fermenting the beer.

Hop Type Chart
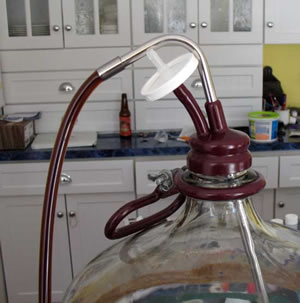
Gravity fed closed carboy setup using an inline sanitary air filter during siphon instead of forced CO2.

Let us start from the moment that your yeast has been pitched. Let's assume we have already properly aerated our wort with either pure oxygen by injecting, stirring, shaking or some other method. You will flood the head (non-liquid-occupied) part of your primary fermenter with a small amount of CO2 through the liquid tube or racking arm, thereby aerating the wort-yeast mixture with CO2 as a mixing device and purging the remaining air and other possible contaminants through the airlock, or opened spunding valve (pressure release valve). Now the spunding valve should be set to open only when 15 PSI or so has been reached. You will need to pressurize the keg slightly with CO2 when starting out to ensure that there is, in fact, an air tight seal and that no air is in the fermenting vessel.

Once your beer has fermented to the point that the desired specific gravity is achieved, it is time to set the carbonation level to the desired volume of CO2. You will want to re-set your spunding valve accordingly, if the desired level of CO2 requires a different setting than you have already dialed-in. Leaving your beer to settle out for a week after specific gravity is reached will help with the finishing.

Clearing and Serving
Now to clear the beer and transfer it to the keg that the beer will be served from. In order to do this, it is advisable to chill the beer to just above freezing, and leave it there for three days to a week. This is called crash cooling, and it causes most of the yeast remaining to fall out of suspension in the beer. This will clear the beer and prevent some of the yeast sediment from being transferred to the serving keg, as well as making it less likely that the CO2 inherent in the beer will come out of the beer as foam.

The serving keg will have to be purged of air, and then filled with CO2 to an equal pressure as that which is maintained in the fermenting keg. If you can chill the serving keg as well, it will be helpful. The idea is that, as the already-carbonated beer is flowing from one keg to the next, you do not want the temperature to change, and the pressure to be very nearly the same. This will prevent foaming.

You will use a regular beer keg tap on the fermenting keg and a special, modified tap for the serving keg during this process. Most Sanke keg systems have a backwash protection mechanism. You will have to modify the tap or valve so that you can bypass the mechanism to flow beer into the keg through the line that is designed to flow beer out in normal circumstances. For soda kegs, this should not be a problem, but for Sanke kegs, the tap used to transfer the beer will most likely have to be modified. The modified tap needs to allow beer into what is normally the beer out port and gas out what is normally the gas in port. The Spunding valve will be mounted on the gas out port of the target, or serving keg, to let pressure out as beer enters the target keg.

You will have to use counter pressure to move the beer smoothly from the fermenting keg to the serving keg. You can also use a filter here if you want the beer to be exceptionally clear. Once the kegs are attached, and the pressure is equalized in both kegs, you should turn up the pressure slightly in the fermenting keg to begin the transfer of beer. You should be able to hear the beer moving from one keg to the other. If the sound stops, turn up the pressure just a little more. This should move all the beer from the fermenting keg to the target keg. You should be able to see through the beer line when you have accomplished this. Now your beer is ready to age and serve whenever the time is right.

Christian Lavender Christian Lavender is a homebrewer in Austin, TX and founder of Kegerators.com and HomeBrewing.com.